Inhaltsverzeichnis
Edge Router X
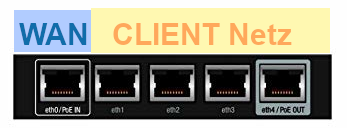
- Standardmäßig ist eth0 der WAN Port und eth1-eth4 sind Client Ports. Um das zu ändern, siehe dort.
- Konfig-Modus: Etwa 12 Sekunden den rückseitigen Reset Taster gedrückt halten.
Freifunk Firmware aufspielen
Muss in zwei Schritten erfolgen, es gibt nur Sysupgrade Images von FF3L.1)
Generisches Factory-Image
Zuerst muss man ein generisches LEDE Factory Image aufspielen: lede-ramips-mt7621-ubnt-erx-initramfs-factory.tar.
Man verbindet zunächst seinen Rechner mit eth0 des Routers und vergibt eine IP Adresse aus dem Bereich 192.168.1.0/24. Jetzt sollte man sich per SSH auf dem Router anmelden können. (Benutzer ubnt, Passwort ubnt, IP 192.168.1.1):
Komplette netzwerk-Config mit
* Wan eth0 * Mesh eth1 u. eth2 * Client eth3 u. eth4
# ssh ubnt@192.168.1.1
The authenticity of host '192.168.1.1 (192.168.1.1)' can't be established.
ECDSA key fingerprint is SHA256:YlFMVGEZHCeBY3yekbPLhHJGjScW0/rus3Q/V+Eg420.
Are you sure you want to continue connecting (yes/no/[fingerprint])? yes
Warning: Permanently added '192.168.1.1' (ECDSA) to the list of known hosts.
Welcome to EdgeOS

By logging in, accessing, or using the Ubiquiti product, you
acknowledge that you have read and understood the Ubiquiti
License Agreement (available in the Web UI at, by default,
http://192.168.1.1) and agree to be bound by its terms.

ubnt@192.168.1.1's password:
Linux ubnt 3.10.107-UBNT #1 SMP Mon Oct 1 12:41:38 UTC 2018 mips
Welcome to EdgeOS
ubnt@ubnt:~$
Nun kopiert man das generische Factory-Image auf den Router:
# scp lede-ramips-mt7621-ubnt-erx-initramfs-factory.tar ubnt@192.168.1.1:/tmp/
Welcome to EdgeOS

By logging in, accessing, or using the Ubiquiti product, you
acknowledge that you have read and understood the Ubiquiti
License Agreement (available in the Web UI at, by default,
http://192.168.1.1) and agree to be bound by its terms.

ubnt@192.168.1.1's password:
lede-ramips-mt7621-ubnt-erx-initramfs-factory.tar
Nun meldet man sich wieder per ssh am Router an, wechselt ins /tmp Verzeichnis und flasht das generische Factory Image:
# ssh ubnt@192.168.1.1
Welcome to EdgeOS

By logging in, accessing, or using the Ubiquiti product, you
acknowledge that you have read and understood the Ubiquiti
License Agreement (available in the Web UI at, by default,
http://192.168.1.1) and agree to be bound by its terms.

ubnt@192.168.1.1's password:
Linux ubnt 3.10.107-UBNT #1 SMP Mon Oct 1 12:41:38 UTC 2018 mips
Welcome to EdgeOS
Last login: Thu Jan  1 00:20:03 2015 from 192.168.1.33
ubnt@ubnt:~$ cd /tmp
ubnt@ubnt:/tmp$ add system image lede-ramips-mt7621-ubnt-erx-initramfs-factory.tar
Checking upgrade image...Done
Preparing to upgrade...Done
Copying upgrade image.../usr/bin/ubnt-upgrade: line 580: [: too many arguments
Done
Removing old image...Done
Checking upgrade image...Done
Copying config data...Done
Finishing upgrade...Done
Upgrade completed
Jetzt muss der Router neu gestartet werden: reboot.2)
Jetzt muss man auf den Anschluss eth1 wechseln, sonst gibts keinen Kontakt zum Router mehr. Die IP des Routers bleibt 192.168.1.1, der Benutzername ist nun root
# ssh root@192.168.1.1
The authenticity of host '192.168.1.1 (192.168.1.1)' can't be established.
RSA key fingerprint is SHA256:bdgRHVtIhzoktQ67WCSQ4Z8iod4Cx1vG2c6lOMkOlXo.
Are you sure you want to continue connecting (yes/no/[fingerprint])? yes
Warning: Permanently added '192.168.1.1' (RSA) to the list of known hosts.


BusyBox v1.26.2 () built-in shell (ash)

     _________
    /        /\      _    ___ ___  ___
   /  LE    /  \    | |  | __|   \| __|
  /    DE  /    \   | |__| _|| |) | _|
 /________/  LE  \  |____|___|___/|___|                      lede-project.org
 \        \   DE /
  \    LE  \    /  -----------------------------------------------------------
   \  DE    \  /    Reboot (SNAPSHOT, r4434-b91a38d)
    \________\/    -----------------------------------------------------------

=== WARNING! =====================================
There is no root password defined on this device!
Use the "passwd" command to set up a new password
in order to prevent unauthorized SSH logins.
--------------------------------------------------
root@LEDE:~#
FF3L Sysupgrade-Image
Nun holt man sich die passende FF3L Sysupgrade Firmware, das ist ebenfalls ein tar-File, das man wieder auf den Router ins /tmp/-Verzeichnis kopiert:
# scp gluon-ff3l-v2018.2.2+001-ubnt-erx-sysupgrade.tar root@192.168.1.1:/tmp/
gluon-ff3l-v2018.2.2+001-ubnt-erx-sysupgrade.tar
Dann geht man wieder per ssh auf den Router und installiert das Sysupgrade image:
# ssh root@192.168.1.1


BusyBox v1.26.2 () built-in shell (ash)

     _________
    /        /\      _    ___ ___  ___
   /  LE    /  \    | |  | __|   \| __|
  /    DE  /    \   | |__| _|| |) | _|
 /________/  LE  \  |____|___|___/|___|                      lede-project.org
 \        \   DE /
  \    LE  \    /  -----------------------------------------------------------
   \  DE    \  /    Reboot (SNAPSHOT, r4434-b91a38d)
    \________\/    -----------------------------------------------------------

=== WARNING! =====================================
There is no root password defined on this device!
Use the "passwd" command to set up a new password
in order to prevent unauthorized SSH logins.
--------------------------------------------------
root@LEDE:~# cd /tmp/
root@LEDE:/tmp# sysupgrade  gluon-ff3l-v2018.2.2\+001-ubnt-erx-sysupgrade.tar
Cannot save config while running from ramdisk.
killall: watchdog: no process killed
Commencing upgrade. All shell sessions will be closed now.
Connection to 192.168.1.1 closed by remote host.
Connection to 192.168.1.1 closed.
Der Router startet neu und ist jetzt ein Freifunk Router, den man wie gewohnt über die Weboberfläche unter der IP 192.168.1.1 im Config-Modus erreicht und konfigurieren kann.
Debricking
Jetzt hats halt leider nicht geklappt, der Router ist in einem Boot-Loop gefangen.
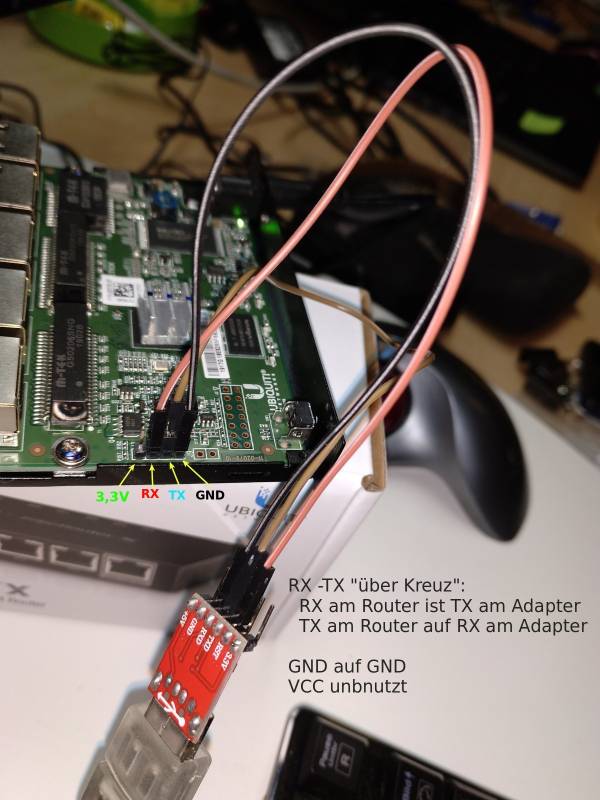
Der Edge Router hat einen Seriellen Port mit Pfostensteckern aufgelötet. Dieser muss mit einem USB-Seriell Adapter verbunden werden, dann kann man sich die Ausgaben auf der Konsole mit dem Befehl screen /dev/ttyUSB0 57600 ansehen:
Fehlerbild auf der Seriellen Konsole:
[    5.044863]         00000000 00000000 80600000 000025f0 00000000 0000008c 00000007 00000000
[    5.061491]         00000000 805a0000 000f4049 00000000 00000000 00000000 805c0000 00000000
[    5.078119]         09420800 00000000 00000800 000004a1 00000000 8029d4d8 00000008 80600008
[    5.094745]         ...
[    5.099600] Call Trace:
[    5.104475] [<800106a0>] show_stack+0x58/0x100
[    5.113340] [<8046509c>] dump_stack+0x9c/0xe0
[    5.121999] [<802f1a38>] ubi_io_read+0x248/0x330
[    5.131181] [<802f2008>] ubi_io_read_vid_hdr+0x94/0x248
[    5.141575] [<802f76f0>] ubi_attach+0x3d4/0x15a4
[    5.150749] [<802eb510>] ubi_attach_mtd_dev+0x6a8/0xbe8
[    5.161148] [<805d9450>] ubi_init+0x344/0x3fc
[    5.169808] [<80005650>] do_one_initcall+0xd0/0x1a0
[    5.179511] [<805c1d84>] kernel_init_freeable+0x168/0x228
[    5.190251] [<8047c43c>] kernel_init+0x10/0x10c
[    5.199256] [<8000b0d8>] ret_from_kernel_thread+0x14/0x1c
[    5.210446] ubi0 error: ubi_attach_mtd_dev: failed to attach mtd5, error -5
[    5.224340] U{{ :anleitungen:edge_router_x:edgerouterx_serial.jpg?600|}}
BI error: cannot attach mtd5
[    5.232347] hctosys: unable to open rtc device (rtc0)
[    5.243267] VFS: Cannot open root device "(null)" or unknown-block(0,0): error -6
[    5.258189] Please append a correct "root=" boot option; here are the available partitions:
[    5.274822] 1f00             512 mtdblock0
[    5.274828]  (driver?)
[    5.287823] 1f01             384 mtdblock1
[    5.287828]  (driver?)
[    5.300821] 1f02             384 mtdblock2
[    5.300826]  (driver?)
[    5.313834] 1f03            3072 mtdblock3
[    5.313839]  (driver?)Der Edge Router hat einen Seriellen Port mit Pfostensteckern aufgelötet. Dieser muss mit einem USB-Seriell Adapter verbunden werden, dann kann man sich die Ausgaben auf der Konsole mit dem Befehl  ''screen /dev/ttyUSB0 57600'' ansehen:
[    5.326833] 1f04            3072 mtdblock4
[    5.326837]  (driver?)
[    5.339831] 1f05          253696 mtdblock5
[    5.339836]  (driver?)
[    5.352839] Kernel panic - not syncing: VFS: Unable to mount root fs on unknown-block(0,0)
[    5.370830] Rebooting in 1 seconds..
Wenn man im uboot Menü die Option (4) wählt, wird der Loop unterbrochen und man kann die Optionen schön ansehen, wenn man dort den Befehl tftpboot eingibt erfährt man außerdem,:
MT7621 # tftpboot

 NetTxPacket = 0x8FFE3E00
Trying Eth0 (10/100-M)

 Waitting for RX_DMA_BUSY status Start... done


 ETH_STATE_ACTIVE!!
TFTP from server 172.16.3.210; our IP address is 172.16.3.212
Filename 'vme50'.
Auf dem eigenen Rechner muss also ein TFTPd3) laufen, der eigene Rechner sollte die IP 172.16.3.210 haben, und das zu ladende Image sollte vme50 heißen. Kann aber am Boot-Prompt bei Bedarf alles auch anders eingeben werden. Man wählt im uboot Menu die Option (2):
Please choose the operation:
   1: Load system code to SDRAM via TFTP.
   2: Load system code then write to Flash via TFTP.
   3: Boot system code via Flash (default).
   4: Entr boot command line interface.
   7: Load Boot Loader code then write to Flash via Serial.
   9: Load Boot Loader code then write to Flash via TFTP.
   r: Start TFTP recovery.
default: 3
Nur einmal drücken! Dann kommt die Abfrage, ob man das wirklich möchte, dann kann man die IPs und den Namen des Factory-Images angeben und das Image wird geholt, geschrieben und gebootet.
Zum Debrick habe ich das „offzielle“ OpenWRT Image von dort genommen. (Direktlink: http://downloads.openwrt.org/releases/18.06.4/targets/ramips/mt7621/openwrt-18.06.4-ramips-mt7621-ubnt-erx-initramfs-kernel.bin)
Anschließend kann man das Sysupgrade Image z.B. per SCP vom eigenen Rechner holen und mit sysupgrade -v flashen.
Netzwerkeinstellungen für Mesh-VPN, Mesh + Client
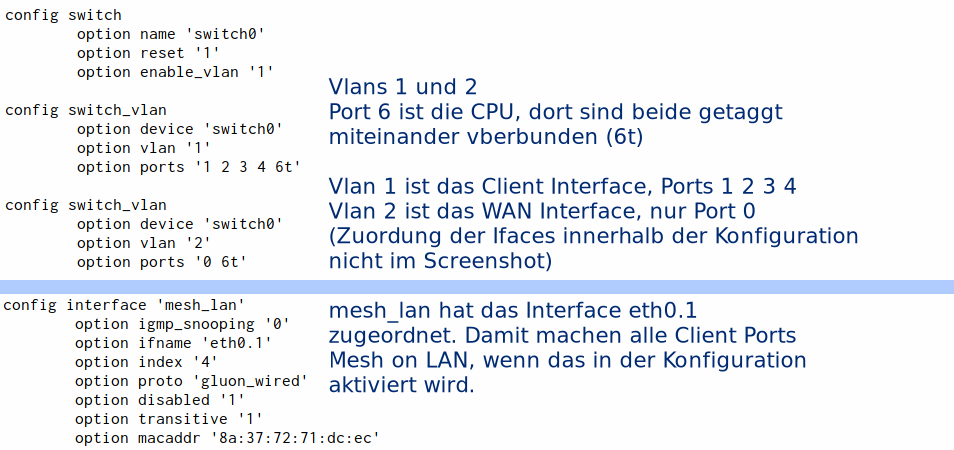
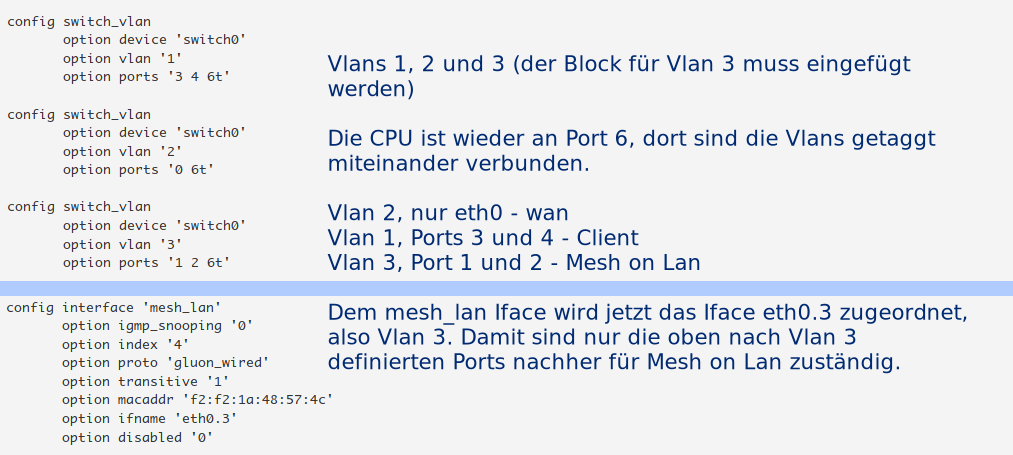
Um auf eth1/eth2 Mesh und eth3/eth4 Client Netz zu haben, geht man folgendermaßen vor.
Vorher:
Nachher:
root@ffmsg-stabue-offload:/etc/config# cat network

config interface 'loopback'
	option ifname 'lo'
	option proto 'static'
	option ipaddr '127.0.0.1'
	option netmask '255.0.0.0'

config globals 'globals'
	option ula_prefix 'fd31:b78e:2c52::/48'

config device 'lan_dev'
	option name 'eth0.1'
	option macaddr '18:e8:29:2f:6f:0c'

config device 'wan_dev'
	option name 'eth0.2'
	option macaddr '18:e8:29:2f:6f:0d'

config interface 'wan6'
	option proto 'dhcpv6'
	option ifname 'br-wan'
	option ip6table '1'
	option sourcefilter '0'
	option peerdns '0'
	option reqprefix 'no'

config switch
	option name 'switch0'
	option reset '1'
	option enable_vlan '1'

config switch_vlan
	option device 'switch0'
	option vlan '1'
	option ports '3 4 6t'

config switch_vlan
	option device 'switch0'
	option vlan '2'
	option ports '0 6t'

config switch_vlan
	option device 'switch0'
	option vlan '3'
	option ports '1 2 6t'

config interface 'wan'
	option igmp_snooping '1'
	option ifname 'eth0.2'
	option multicast_querier '0'
	option peerdns '0'
	option auto '1'
	option type 'bridge'
	option proto 'dhcp'
	option macaddr 'f2:f2:1a:48:57:48'

config rule6 'wan6_lookup'
	option mark '0x01/0x01'
	option lookup '1'

config route6 'wan6_unreachable'
	option type 'unreachable'
	option table '1'
	option target '::/0'
	option metric '65535'
	option gateway '::'
	option interface 'loopback'

config interface 'mesh_wan'
	option ifname 'br-wan'
	option index '0'
	option proto 'gluon_wired'
	option disabled '1'
	option transitive '1'

config interface 'mesh_lan'
	option igmp_snooping '0'
	option index '4'
	option proto 'gluon_wired'
	option transitive '1'
	option macaddr 'f2:f2:1a:48:57:4c'
	option ifname 'eth0.3'
	option disabled '0'

config interface 'mesh_vpn'
	option ifname 'mesh-vpn'
	option transitive '1'
	option mtu '1398'
	option macaddr 'f2:f2:1a:48:57:4f'
	option fixed_mtu '1'
	option proto 'gluon_mesh'

config interface 'client'
	option igmp_snooping '1'
	option type 'bridge'
	option auto '1'
	option ra_holdoff '30'
	option multicast_querier '1'
	option macaddr '18:e8:29:2f:6f:0c'
	list ifname 'eth0.1'
	list ifname 'local-port'
	list ifname 'bat0'
	option ipv6 '1'
	option keep_ra_dnslifetime '1'
	option sourcefilter '0'
	option peerdns '1'
	option robustness '9'
	option reqprefix 'no'
	option query_interval '2000'
	option query_response_interval '500'
	option proto 'dhcpv6'

config device 'local_node_dev'
	option type 'veth'
	option name 'local-node'
	option peer_name 'local-port'
	option macaddr '16:41:95:40:f7:dc'
	option peer_macaddr '18:e8:29:2f:6f:0c'

config interface 'local_node'
	option ifname 'local-node'
	option ipaddr '10.119.224.1/20'
	option ip6addr 'fdc7:3c9d:ff31:e::1/128'
	option ip6deprecated '1'
	option proto 'static'

config interface 'gluon_bat0'
	option proto 'gluon_bat0'

config interface 'bat0'
	option multicast_router '2'
	option ifname 'bat0'
	option auto '1'
	option macaddr '18:e8:29:2f:6f:0c'
	option learning '1'
	option proto 'none'

config route6 'local_node_route6'
	option target 'fdc7:3c9d:ff31:e::/64'
	option gateway '::'
	option interface 'client'
show system image kann man bei Bedarf des Status des Routers ansehen./etc/conf.d/tftpd konfiguriert und mit systemd gestartet: systemctl start tftpd.service


